Welcome to your first Arduino project! In this tutorial, we’ll walk you through the basics of Arduino and create a simple LED blinking project. This is a foundational project that will introduce you to the world of electronics and programming with Arduino.
What is Arduino?
Arduino is an open-source electronics platform based on easy-to-use hardware and software. It’s intended for anyone making interactive projects. Arduino boards can read inputs – light on a sensor, a finger on a button, or a Twitter message – and turn it into an output – activating a motor, turning on an LED, or publishing something online.
What You Will Need
To start with the LED blinking project, you will need the following components:
- Arduino Board (e.g., Arduino Uno)
- LED
- 330-ohm Resistor
- Breadboard
- Jumper Wires
- USB Cable (to connect the Arduino to your computer)

Setting Up the Arduino IDE
Before we can start coding, you need to set up the Arduino Integrated Development Environment (IDE) on your computer.
Download the Arduino IDE:
- Go to the Arduino Software page and download the latest version of the Arduino IDE for your operating system.
Install the Arduino IDE:
Connect Your Arduino:
- Use the USB cable to connect your Arduino board to your computer. The power LED on the Arduino board should light up.
Writing Your First Program: Blinking an LED
Now that you have the Arduino IDE installed and your board connected, let’s write a simple program to blink an LED.
Step 1: Connect the LED
Now that you have the Arduino IDE installed and your board connected, let’s write a simple program to blink an LED.
Step 1: Connect the LED
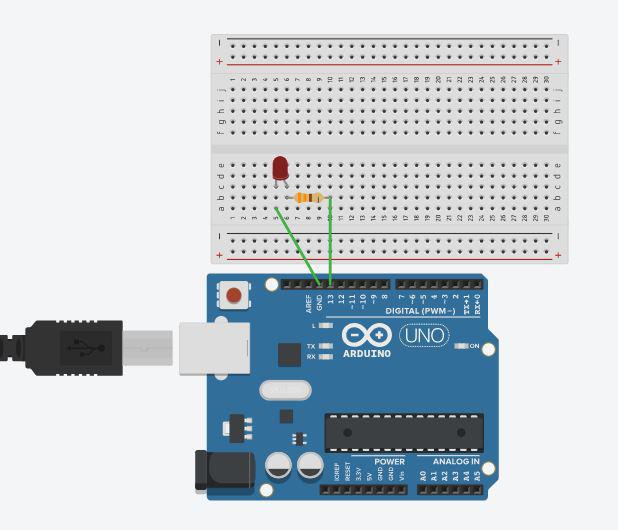
1.Place the LED on the Breadboard:
- The longer leg of the LED is the anode (+) and should be connected to a 220-ohm resistor. The shorter leg is the cathode (-) and should be connected to the ground (GND) pin on the Arduino.
2.Connect the Resistor:
- One end of the resistor connects to the anode of the LED. The other end connects to pin 13 on the Arduino board.
3.Make the Ground Connection:
- Use a jumper wire to connect the cathode of the LED to one of the GND pins on the Arduino.
t
Step 2: Write the Code
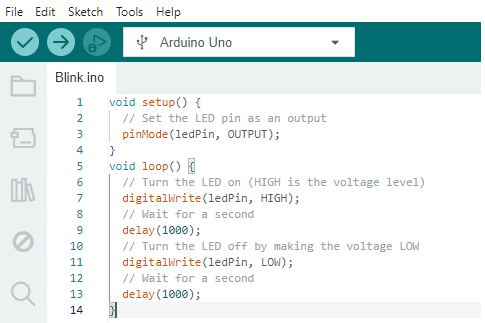
Open the Arduino IDE and enter the following code:
void setup() {
  // Set the LED pin as an output
  pinMode(ledPin, OUTPUT);
}
void loop() {
  // Turn the LED on (HIGH is the voltage level)
  digitalWrite(ledPin, HIGH);
  // Wait for a second
  delay(1000);
  // Turn the LED off by making the voltage LOW
  digitalWrite(ledPin, LOW);
  // Wait for a second
  delay(1000);
}
Step 3: Upload the Code
- Select Your Board and Port:
- In the Arduino IDE, go to
Tools > Boardand select your Arduino board model.
- In the Arduino IDE, go to
- Then go to
Tools > Portand select the port that your Arduino is connected to.
- Then go to
- Select Your Board and Port:
- Upload the Code:
- Click the upload button (right arrow) in the Arduino IDE. The code will be compiled and uploaded to your Arduino board.
- Upload the Code:
Step 4: Observe the Result
Once the upload is complete, you should see the LED start blinking with a 1-second interval. This means you’ve successfully programmed your Arduino to blink an LED!
Understanding the Code
Define the LED Pin:
int ledPin = 13;This line defines a variable ledPin and assigns it the value 13, which corresponds to the pin number where the LED is connected.
Setup Function:
void setup()
{
  pinMode(ledPin, OUTPUT);
}
The setup function runs once when you press the reset button or power the board. It sets the LED pin as an output.
Loop Function:
void loop() {
  digitalWrite(ledPin, HIGH);
  delay(1000);
  digitalWrite(ledPin, LOW);
  delay(1000);
}
The loop function runs over and over again, making the LED blink. digitalWrite(ledPin, HIGH) turns the LED on, delay(1000) waits for 1 second, digitalWrite(ledPin, LOW) turns the LED off, and delay(1000) waits for another second.
Troubleshooting Tips
If your LED isn’t blinking, check the following:
- Ensure all connections are secure and correct.
- Verify that the LED is oriented correctly (longer leg should be connected to the resistor).
- Make sure you’ve selected the correct board and port in the Arduino IDE.
Conclusion
Congratulations! You’ve completed your first Arduino project. The LED blinking project is a simple yet powerful way to understand the basics of Arduino programming and electronics. From here, you can explore more complex projects and start building your own interactive devices.
Stay tuned for more tutorials and happy tinkering!